Mud kitchen ideas are the secret weapon every parent needs for keeping kids engaged, creative, and learning outdoors. A mud kitchen for kids is a simple outdoor play station where children mix mud, water, leaves, and other natural materials in pretend cooking play. Whether you are building a DIY mud kitchen from recycled pallets or buying a ready-made outdoor play kitchen, these setups deliver massive developmental benefits. Research in outdoor learning consistently shows that sensory play in nature builds confidence, focus, and fine motor skills. From backyard mud kitchen builds to themed mud kitchen designs, this guide gives you 10 inspiring mud kitchen ideas that work for all ages, budgets, and outdoor spaces, along with everything you need to set one up successfully.
10 Mud Kitchen Ideas for Outdoor Play
1. Classic DIY Pallet Mud Kitchen

The most popular and budget-friendly option, a pallet mud kitchen uses recycled wooden pallets to create a sturdy work surface with built-in shelving. Sand the pallets smooth, attach a basin for the sink, and paint or stain for weather protection.
This easy mud kitchen DIY requires minimal tools and costs very little when pallets are sourced for free from local businesses. It is one of the top mud kitchen ideas for families wanting a quick weekend project that looks great and lasts for years.
Best for: Families on a budget, beginners to DIY outdoor toys, small to medium backyards.
Tips: Use food-grade paint, seal all surfaces with outdoor wood sealant, and add a roofing panel overhead for all-weather use.
2. Wooden Mud Kitchen with Full Counter and Shelving

A step up from the pallet version, a wooden mud kitchen built from treated timber or reclaimed wood offers a more polished, durable outdoor kitchen toy. These setups often include multiple counter levels, open shelving for storing containers and utensils, and a proper basin plumbed to a small water barrel above.
This style suits families who want a permanent backyard play area feature that looks aesthetically integrated into the garden. A wooden mud kitchen can match existing decking or fencing and ages beautifully with natural weathering.
Best for: Permanent installations, larger outdoor spaces, families with multiple children.
Tips: Use tanalized timber rated for ground contact, pre-drill all joints to prevent splitting, and add a chalkboard panel to the front for menus and recipes.
3. Mud Kitchen with Real Running Water

Adding a gravity-fed water system transforms any basic outdoor mud kitchen into an extraordinary sensory play station. Position a large water butt or barrel at height behind the structure, connect a flexible hose to a tap at sink level, and children have on-demand running water for their play.
This setup is the ultimate in outdoor sensory play because it allows kids to control water flow independently, filling pots, watering plants, and exploring water pressure. It closely mirrors Montessori outdoor play environments that prioritize child autonomy.
Best for: Children aged 3 to 8, sensory-seeking kids, hot climates where water play extends the season.
Tips: Place the kitchen on grass or gravel rather than paving to allow drainage, use a waterbutt with overflow to manage levels, and empty in freezing temperatures.
4. Themed Mud Kitchen: Mud Café or Bakery

A themed mud kitchen lifts the entire play experience by giving children a narrative context for their pretend cooking outdoors. A kids mud café or mud bakery theme includes a menu board, labelled jars of loose parts (flower petals, seeds, herbs), and a serving hatch or window.
Themed mud kitchen ideas work especially well for school-age children who enjoy extended role play activities for children. The structure of a café or bakery prompts complex social play, turn-taking, and language development without any adult direction needed.
Best for: Children aged 4 to 10, playgroups, childminders, nursery settings.
Tips: Laminate a printed menu board for durability, provide aprons and chef hats for dress-up, and rotate loose parts seasonally to keep play fresh.
5. Fairy Garden Mud Kitchen

A fairy garden mud kitchen blends outdoor mud kitchen play with magical, nature-inspired design. Incorporate miniature fairy doors, moss, small stones, and tiny accessories to create an enchanted play space that sparks storytelling and imaginative outdoor play.
This style is particularly appealing to toddlers and younger children who love fantasy themes. The fairy garden mud kitchen encourages nature play ideas by keeping decoration materials entirely natural, teaching children to look closely at the world around them.
Best for: Toddlers and children aged 2 to 6, small garden spaces, nature-inspired play spaces.
Tips: Use driftwood, pinecones, shells, and seedpods as loose parts; plant edible herbs like mint nearby so children can smell and add real leaves to their mud pies.
6. Pirate Themed Mud Kitchen

For adventurous children who love active outdoor play, a pirate themed mud kitchen turns messy play activities into a swashbuckling expedition. Add rope nets, a small barrel as a stool, weathered treasure chest storage for tools, and a nautical flag.
The storytelling possibilities of a pirate-themed backyard mud kitchen keep children engaged across multiple play sessions. This is one of the most popular creative backyard activities for families with school-age children who have outgrown simpler setups.
Best for: Children aged 4 to 9, families with multiple siblings, children who enjoy active fantasy play.
Tips: Paint the kitchen in dark navy or charcoal tones, add gold stencilling, and use salvaged ropes and netting from boating suppliers for authentic texture.
7. Budget Mud Kitchen from Upcycled Furniture

Not every mud kitchen needs to be purpose-built. An old side table, dresser, or bookshelf can be repurposed into a fully functional outdoor play kitchen with minimal effort. Remove drawers, add a basin, seal with exterior paint, and you have an instant recycled play kitchen that cost almost nothing.
This approach to DIY mud kitchen builds supports eco-friendly kids play values and teaches children about sustainability. Upcycled furniture mud kitchens often have character and charm that new-build versions lack.
Best for: Renters or families who move frequently, minimal budget, quick setup.
Tips: Charity shops, Facebook Marketplace, and freecycle groups are excellent sources; always sand and seal wood before outdoor use; choose pieces with sturdy frames that will not warp quickly.
8. Seasonal Mud Kitchen: Winter Ready

A seasonal mud kitchen is designed to be used year-round, including in colder months. Key features include a weatherproof canopy or shelter, a small outdoor-safe lantern for shorter winter days, and a supply of warm water carried out in a thermos for cold-weather play.
Winter mud kitchen use aligns closely with forest school activities principles that emphasise outdoor learning in all weather conditions. Children learn about seasonal change, ice, freezing, and thawing directly through play.
Best for: All ages, families who value outdoor learning activities throughout the year, UK and Northern European climates.
Tips: Dress children in waterproof suits and wellies; freeze flowers and herbs into ice blocks for nature-themed loose parts; keep a boot brush and outdoor sink nearby for post-play cleaning.
9. Mud Kitchen with Sensory Station Add-Ons

Expanding the basic mud kitchen setup into a full backyard sensory station gives children a wider range of play experiences in one space. Add a sand tray, a water table, a digging patch, and a loose parts shelf alongside the main mud kitchen to create a backyard play area that supports multiple types of sensory development activities.
This expanded approach is popular in nurseries, forest schools, and professional childcare settings as an all-in-one outdoor learning activities hub. It supports all developmental stages and works across a wide age range.
Best for: Nurseries, childminders, families with children of mixed ages (18 months to 8 years).
Tips: Use landscape fabric under gravel areas to prevent weeds; clearly zone each section with low timber edging; provide a small covered storage box for each activity’s tools.
10. Mud Kitchen for Toddlers: Low Height and Safe Design

A mud kitchen for toddlers needs specific design consideration. Lower counter heights (around 45–50cm), rounded edges, non-toxic sealants, and stable construction without tipping risk are all essential. Choose containers without sharp edges, use silicone kitchen tools rather than metal, and avoid small loose parts that could be swallowed.
Toddler outdoor activities centred on a mud kitchen are among the most developmentally rich experiences you can offer at this age. The sensory input from mud, water, and natural materials supports brain development in ways that structured toys cannot replicate.


Best for: Children aged 12 months to 3 years, nursery settings, supervised outdoor play.
Tips: Anchor the structure to the ground or a wall to prevent tipping; always supervise toddlers around water; use trays with raised edges to contain mess and reduce frustration.
What to Put in a Mud Kitchen: Essential Accessories
Stocking your outdoor mud kitchen correctly makes a significant difference to the quality and longevity of play. The best mud kitchen accessories are a mix of functional tools and open-ended loose parts.
Essential mud kitchen tools and equipment: Mixing bowls and pots in varying sizes, measuring cups and spoons, muffin trays and cake moulds, colanders and sieves, wooden spoons and spatulas, small watering cans, a hand brush and dustpan, and waterproof aprons.
Loose parts for sensory and imaginative play: Dried pasta and pulses, flower petals, herbs, pine cones, pebbles, shells, seed heads, twigs, leaves, and food colouring for special effects.
Mud kitchen accessories for extended play: A chalkboard for menus, recipe cards laminated for outdoor use, small herb pots nearby, labels for jars, and seasonal additions like autumn leaves or spring blossoms.
Rotate loose parts regularly to prevent play stagnation. Introducing new materials monthly keeps children returning to the mud kitchen with fresh curiosity.
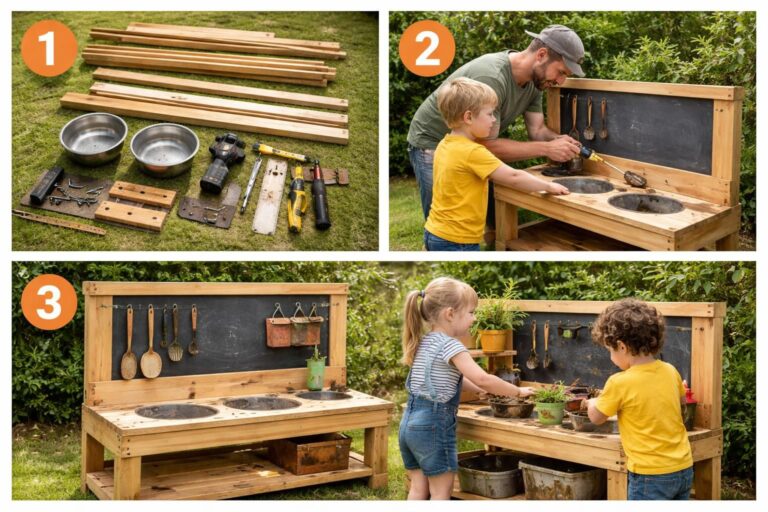
How to Build a DIY Mud Kitchen: Step-by-Step Guide
Building a mud kitchen for kids does not require advanced carpentry skills. A basic DIY pallet mud kitchen can be completed in a single afternoon with common tools.
Materials needed: Two or three wooden pallets, exterior wood sealant or paint, a metal or plastic basin for the sink, galvanised screws, sandpaper (medium and fine grit), and optional weatherproof legs or feet to raise the structure off the ground.
Step 1 — Prepare the pallets. Sand all surfaces thoroughly to remove splinters. Wipe clean and allow to dry fully before sealing.
Step 2 — Seal the wood. Apply two coats of exterior-grade wood sealant or non-toxic outdoor paint. Allow each coat to dry completely.
Step 3 — Build the structure. Stand two pallets upright as the side walls and lay the third horizontally as the work surface. Secure with galvanised screws at every joint.
Step 4 — Install the sink. Cut or position the basin into the work surface. If using a metal bowl, trace around it, cut a hole slightly smaller than the rim, and drop the basin in.
Step 5 — Add finishing touches. Mount hooks on the side for hanging tools, add a shelf below for storage, and install any optional features like a tap or chalkboard panel.
The total cost of a homemade mud kitchen built this way is typically under £30 to £50 when pallets are sourced for free.
Mud Kitchen Safety Tips for Parents and Educators
Safety is an important consideration when setting up any outdoor mud kitchen, particularly for younger children.
Mud kitchen safety tips to follow include: always supervising children under three around water, checking the structure regularly for splinters or loose screws, ensuring all paint and sealant used is non-toxic and fully cured before children use the kitchen, keeping standing water emptied when the kitchen is not in use to prevent mosquito breeding and accidental drowning risk, and teaching children basic hygiene, including washing hands after mud play.
For toddler-specific setups, remove all loose parts that are small enough to be a choking hazard and ensure basins are shallow enough that a young child cannot submerge their face.
Mud Kitchen Maintenance: Keeping It in Great Condition
A well-maintained outdoor mud kitchen lasts for many years. Key mud kitchen maintenance steps include re-sealing wood annually before the rainy season, checking screws and joints each spring for corrosion or loosening, cleaning the basin and tools with plain water regularly, storing fabric accessories like aprons and chalkboards indoors during winter, and sanding and repainting any areas where paint begins to peel.
In very cold climates, drain all water systems, invert basins, and store metal tools indoors over winter to prevent frost damage.
Buying Guide: Choosing the Best Mud Kitchen
If a DIY build is not practical, the outdoor mud kitchen market offers a wide range of ready-made options at various price points.
Budget options (under £50): Basic plastic or composite structures with limited features; good starter options for younger toddlers; less durable over time.
Mid-range options (£50 to £150): Wooden mud kitchens with pre-drilled sink holes, basic shelving, and non-toxic finishes; best balance of quality and affordability; most popular category.
Premium options (£150 and above): Solid timber construction, included accessories, water systems, themed designs; built to last five or more years with proper maintenance; ideal for nurseries or families planning long-term use.
When comparing products, prioritise non-toxic finishes, stability, weather-resistance, and appropriate counter height for your child’s age. Educational outdoor toys at the premium end often come with structured loose parts kits and activity cards.
Frequently Asked Questions
What is a mud kitchen?
A mud kitchen is an outdoor play structure that mimics a real kitchen, giving children a dedicated space to explore mud, water, and natural materials through imaginative pretend cooking play.
How do you make a DIY mud kitchen?
You can build a basic DIY mud kitchen using two or three recycled pallets, exterior sealant, a metal basin, and galvanised screws — the whole project typically takes one afternoon and costs under £50.
Why are mud kitchens good for kids?
Mud kitchens support sensory development, fine motor skills, STEM learning, language development, and emotional regulation by providing unstructured, child-led outdoor play with natural materials.
What should I put in a mud kitchen?
Stock your mud kitchen with mixing bowls, spoons, sieves, measuring cups, and loose parts like flower petals, pine cones, pebbles, and herbs to encourage creative and sensory play.
Are mud kitchens safe for toddlers?
Yes, when built or chosen with toddler-appropriate dimensions, non-toxic materials, stable construction, and adult supervision around water, mud kitchens are a safe and beneficial play option for children from 12 months upward.
How do you maintain a mud kitchen?
Re-seal wood annually, check screws and joints each season, clean basins regularly with plain water, and store fabric accessories indoors during winter to keep your mud kitchen in great condition.
Can mud kitchens be used in winter?
Yes. Adding a canopy or shelter, using warm water in a thermos, and dressing children in waterproof suits allows year-round outdoor mud kitchen use, supporting forest school values of outdoor learning in all weather.
What tools are needed for a mud kitchen?
Essential mud kitchen tools include mixing bowls, wooden spoons, measuring cups, colanders, sieves, moulds, a small watering can, and a hand brush — all sourced from kitchen shops or charity stores affordably.
How much does a mud kitchen cost?
A DIY pallet mud kitchen can cost as little as £20 to £50, while ready-made options range from under £50 for basic models to over £150 for premium wooden outdoor play kitchens.
What age is best for a mud kitchen?
Mud kitchens are suitable from around 12 months with close supervision through to age 10 or beyond; peak engagement is typically between 2 and 7 years when imaginative and sensory play is at its most intense.
Key Takeaways
Mud kitchens combine sensory play, creativity, and outdoor learning in one space. A DIY pallet mud kitchen can be built for under £50 in a single afternoon. Themed mud kitchens like cafés, fairy gardens, and pirate ships extend play depth. Rotate loose parts regularly to keep play fresh and engaging. Mud kitchens are safe for toddlers when built to age-appropriate specifications.
Conclusion
Mud kitchen ideas bring together the best of outdoor sensory play, imaginative role play, and hands-on learning in one simple, beautiful setup. Whether you choose a classic DIY pallet mud kitchen, an upcycled furniture build, a themed mud café, or a toddler-height mud kitchen for your youngest child, the investment in outdoor play pays back in confidence, creativity, and genuine joy. Start small with a basic structure and a handful of loose parts, then grow the space as your child’s interests develop. The best mud kitchen is the one that gets used every day, rain or shine.