1")
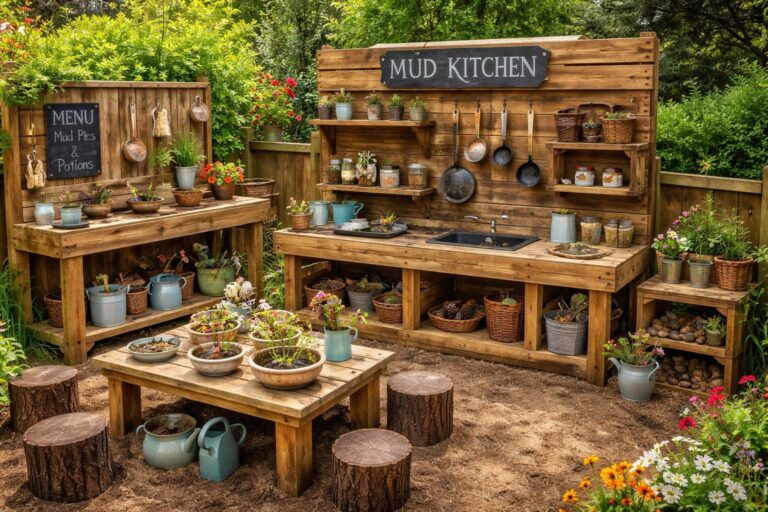
If you want your kids to ditch the screens and spend real time outside, a mud kitchen might be the best thing you ever build. A mud kitchen is a simple outdoor play station where children mix dirt, water, and natural materials to “cook” imaginary recipes. It takes a weekend to build, costs very little, and gives kids a dedicated space to get wonderfully messy. You can make one with scrap wood, a plastic tub, and basic tools. This step-by-step guide walks you through planning, building, and decorating a backyard mud kitchen your kids will use again and again.
Why Every Backyard Needs a Mud Kitchen
There’s a reason mud kitchens have taken over Pinterest boards and parenting blogs. They work. Kids who have a dedicated outdoor play space spend more time outside, period. But beyond just getting fresh air, here is what children gain from regular mud kitchen play:
- Creative thinking: Open-ended play without rules or screens pushes kids to invent their own games and stories.
- Sensory development: Squishing mud, pouring water, and sifting sand stimulates the senses in ways that toys rarely do.
- Early STEM skills: Measuring, mixing, and observing changes in materials lays the groundwork for science and math concepts.
- Social skills: Whether playing alone or with friends, kids practice patience, communication, and sharing without even realizing it.
- Confidence: Building and finishing something with their own hands gives children a real sense of accomplishment.
The mess happens outside, not in your real kitchen. That alone is a win.
Step 1: Plan Your Mud Kitchen Before You Build Anything
Good planning saves you time, money, and frustration. Before you cut a single piece of wood, settle these three things first.
Pick the Right Location
Look for a flat spot that you are comfortable getting dirty. Grass, bare soil, or a corner of the patio all work well. The key things to consider:
 2")
- Supervision: For younger kids, place the kitchen where you can see it from inside the house or from a seating area.
- Drainage: Avoid placing it right up against the house where muddy water could pool or splash onto walls.
- Shade: A spot with partial shade keeps kids comfortable and prevents the wood from drying out too fast.
Decide on the Height and Size
Counter height matters more than most people think. A counter that is too tall or too short turns playtime into a frustration. A general rule of thumb:
- Toddlers (1–4 years): Aim for a counter height between 18 and 20 inches.
- Older kids (5–10 years): A counter between 24 and 26 inches feels comfortable.
You can always adjust leg lengths after the fact if needed, so do not stress too much about getting it perfect on the first try.
Gather Your Materials and Tools
Here is everything you will need for a basic freestanding mud kitchen with a counter and sink:
Materials:
- 2×4 lumber or reclaimed pallet wood for the frame and legs
- Wider boards for the countertop surface
- One plastic tub or old wash basin for the sink
- Exterior-grade deck screws (2.5 inch for frame joints, 1.25 inch for surface boards)
Tools:
- Hand saw or circular saw
- Power drill with bits
- Measuring tape and pencil
- Sandpaper (80 to 120 grit)
Optional extras: outdoor paint or wood stain, clear waterproof sealant, cup hooks, old knobs or handles
Reclaimed wood and pallets are perfect for this project. They keep costs near zero and give the finished kitchen a rustic, charming look. Just check for old nails and splinters before you start.
Step 2: Build the Structure Step by Step
This is the part that looks harder than it is. The basic mud kitchen is just a sturdy table with a hole cut out for the sink. Here is how to put it together.
Build the Frame First
Start by cutting four boards to form a rectangular top frame. Two long boards run front to back, and two shorter boards connect the sides. Screw the pieces together at the corners to form a solid rectangle. This frame will support the countertop surface and hold the sink in place.
Once the frame is assembled, attach four legs to the corners. A popular design trick is to make the back legs taller than the front legs, typically 36 to 48 inches versus 24 inches in the front. The extra height on the back creates a natural backsplash and gives you a place to add a small shelf or hooks later.
Use long screws to secure each leg firmly to the frame corners. Have someone hold the structure steady while you drive the screws in, and use a level to confirm everything sits flat.
Add the Countertop and Sink Cutout
Lay boards across the top frame to create the counter surface. Fence boards or deck boards work great here. Screw them down flush with the frame edges.
For the sink, leave a gap in the countertop boards sized to fit your plastic tub. The easiest method is to trace around the rim of the tub on the boards, then cut along the inside of that line. The tub rim should rest on the counter edges like a ledge, holding the basin in place without any extra support needed.
No jigsaw? Skip the cutout. Just leave one section of the frame open and drop in the tub so it rests on two cross-beams screwed between the front and back of the frame. Same result, simpler process.


Add a Bottom Shelf (Recommended)
A lower shelf is not required, but it makes the kitchen far more functional. Screw a support board across the front legs about 6 inches up from the ground, then do the same on the back legs. Lay a few boards across those supports to form a shelf.
Kids can store buckets, extra pots, and bags of sand down here. The shelf also braces the legs and makes the whole structure noticeably sturdier.
Step 3: Finish, Decorate, and Stock the Kitchen
The structure is done. Now comes the fun part that kids will actually remember.
Sand and Seal the Wood
Run sandpaper over every surface, paying special attention to cut edges and corners. Smooth wood prevents splinters and makes the kitchen safer for small hands.
Once sanded, apply an outdoor wood stain or paint to protect the wood from moisture. Follow up with a clear waterproof sealant over any areas that will get regularly wet, especially around the sink. Sealed wood lasts years longer than untreated wood, and it is much easier to hose clean after messy play sessions.
Plan to reapply a fresh coat of sealant every couple of years to keep the wood protected.
Add Personality with Fun Details
This is where your mud kitchen goes from plain structure to something kids will be obsessed with. A few ideas that are easy and inexpensive:
- Painted burners: Use black paint to draw stovetop circles on the counter surface.
- Spinning knobs: Drill short wooden dowel pieces onto the backsplash so they turn like oven dials. Old knobs from broken appliances work perfectly too.
- Utensil hooks: Screw a few cup hooks into the backsplash for hanging ladles, spoons, and mini pots.
- Chalkboard panel: Paint a section of the backsplash with chalkboard paint so kids can write their daily specials.
- Pretend faucet: Mount a salvaged faucet or a PVC pipe fixture near the sink. It does not need to actually work to make the kitchen feel real.
None of these extras need to be perfect. The charm of a handmade mud kitchen is in its imperfection.
Stock It and Let Them Cook
Before you call the kids over, fill the kitchen with the essentials. Thrift stores are the best source for this, look for:
- Old pots, pans, and mixing bowls
- Spatulas, wooden spoons, and ladles
- Muffin tins and measuring cups
- Small plastic containers and jars
Set out one bucket of soil or sand and one bucket of water as starter ingredients. Add natural loose materials like pebbles, leaves, pine cones, or flower petals nearby. Then step back.
Kids will start cooking immediately without any instruction. That is the beauty of a mud kitchen.
Keeping the Mud Kitchen Clean and Long-Lasting
The mess is the point, but a simple routine keeps things manageable. After playtime, toss all the muddy tools into a large bin and rinse them with a garden hose. Spray down the counter and shelves. Empty the sink basin so standing water does not sit overnight.
If you live somewhere with harsh winters, cover the kitchen with a tarp or move it to a covered area during the coldest months. This one habit can easily double the lifespan of your build.
Common Questions About Building a Mud Kitchen
Do I need real plumbing or a water hookup?
No. Most mud kitchens work with a simple bucket of water that gets refilled as needed. This keeps water use controlled and prevents the area from turning into a swamp.
Can I use pallet wood to build one?
Absolutely. Pallet wood is one of the most popular choices for mud kitchen builds because it is free, sturdy, and gives the kitchen a great rustic look. Sand it thoroughly and remove any old hardware before building.
What age range is a mud kitchen good for?
Children as young as 18 months can enjoy a mud kitchen with supervision. The sweet spot is ages 3 to 7, but plenty of kids up to age 10 still love it. Build it at the right height for your child’s current age and adjust as they grow.
How do I stop the wood from rotting?
Use cedar or another naturally rot-resistant wood if possible. Apply exterior paint or stain followed by a clear waterproof sealant. Reapply every couple of years. Keeping the kitchen off bare soil by placing it on pavers or gravel also helps air circulate and reduces moisture buildup under the legs.
Building a mud kitchen is one of those projects that pays off far more than the effort you put in. A weekend of work gives your kids a creative outdoor space they will return to for years, and you get the satisfaction of watching them play freely in a space you built for them. Get outside, grab some wood, and start building.